DIY Knitting Hacks
A knitter’s life is made easier and the act of knitting itself is more enjoyable thanks to the enormous variety of knitting tools and accessories. These handcrafted stitch markers, gorgeous knitting needles, exquisite yarn bowls, and a long number of other items are not only functional but also attractive.
Unfortunately, we often lack access to them because equipment malfunctions, breaks, or is just out of our price range. When that happens, inventiveness, do-it-yourself projects, and hacks can be useful.
Stitch markers
When knitting in the round or with a complex stitch pattern, stitch markers come in quite handy because they eliminate the need to continually check your stitches.
You can replace the markers with your own DIY yarn markers, which are quite simple to produce, whether you don’t want to spend any further money on them or you have ran out of them (they tend to disappear one by one, exactly like hairpins).
Take any extra yarn, cut it to a length of 10-15cm (4-6 inches), fold it in half, and then create a loop to hang from your needle. You’ve just created a stitch marker, Any time of day or night, you can create as many markers as you require. They have freedom. Additionally, if you use a different color of yarn, you can use your markers to create a color-coding scheme.
Paper clips can also be used in place of stitch markers, but use caution as they have a tendency to catch the yarn.
Needle caps
When you aren’t knitting, needle caps prevent the stitches from falling off the needles. They serve as a safety net when you cast on stitches using double-pointed or circular needles. I must admit that I have never had them, but you can get by if you have rubber bands about the house.
Take one rubber band and wrap it around your needle; that is all there is to it. It will hold the stitches in place and secure them. The smaller elastics are preferable because the larger ones create too many extra loops on the needle.
Yarn bowl
Your yarn won’t roll around and occasionally end up on the floor, under the table, etc. if you use a yarn bowl to keep it contained. Additionally, your yarn stays tidy and untangled, and the entire knitting process is more pleasant and streamlined. Although these bowls are lovely and frequently have unique designs, they are expensive, so consider making a substitute first. Not as attractive, but try the DIY version first if you’re not sure if you need one to make up your mind. You only need a bowl that isn’t in use and a binder clip. The clip directs the thread once the yarn is placed in the bowl. If you want to downgrade, you can remove the clip.
Loose cast on
You can cast on over two needles if you knit tightly or if you need a loose cast on to make the ribbing more elastic. Your edge will be stretchier in this manner while maintaining a tidy appearance. The distance between the stitches is likely to be irregular if you simply cast on very loosely over one needle because you aren’t tightening them. Simply perform the standard cast-on and remove the second needle after you’re finished. When I cast on for socks or a hat, I use this trick to ensure the edge is precise and the first row of the ribbing isn’t too tight.
DIY Small Concrete Slab Installation
You’ll need to start pouring concrete and laying a slab soon, whether you’re constructing a little patio or, like I did, laying the foundation for a small shed. The choice of whether to “Do It Yourself” the project or hire a contractor follows from that. Fortunately, I’m here to be the test subject to determine if this is a one man (or woman) job and if it’s within budget!Cost and time are always concerns, but so is how reachable a project like this is!
Where To Start
We’re all about that bass, if the last few years of mainstream music have taught me anything. In this instance, base, er. Although concrete will do what concrete does, the foundation of your pour is crucial. Unfortunately, you have to dig a hole and then fill it back up in order for that to function. My slab, which butts up against my store, will be a 4 foot by 6 foot pour. So, in order to locate the border of the concrete slab, I first had to remove several years’ worth of ground cover, and then I had to dig down 8 to 10 inches.
Because I have a ton of broken concrete bits from a previous project, I had to dig a little bit deeper. I had intended to use that waste for rubblization rather than dispose of it in a landfill. Which means I could strengthen and fill my foundation with scrap material rather than adding countless bags of base filler.
I started to add bags and bags of All Purpose Gravel once my eyesore of a busted concrete mound had finally been eliminated. Which is more like a gravel and sand mix. It was time to get the compactor out once I had placed a few inches of filler on top of the concrete filler. When the throttle is set, it will easily move over your work area, compacting anything you place in front of (or beneath) it.
What about rebar before we talk about concrete? I won’t need it for this project, personally. Given the size of the slab, our typical temperatures, and the fact that this foundation will only support a small amount of weight, it is not required. I did use industrial grade cement for increased early strength just in case.
The Concrete Pour
First, let’s discuss the challenging portion. I don’t mean the concrete, either. Let’s discuss the math. Many excellent concrete calculators are available online for no cost. Decide on the space you need to fill and check to see if you can choose the weight of your bags. Since the calculator I used was for 80 lbs., I… did not do that bags when I bought 50 pounds. Naturally, I had 10 bags too little, which is not where you want to be once mixing has begun. Consider this as well: 50 pounds and 80 pounds. Bags quickly accumulate. Can your car carry a ton more weight if you need more than 30 bags of concrete?
After seeing how unfit I had become from lifting and carrying more than 1500 pounds, It was time to get to work moving the shelves’ worth of concrete to a cart, cart to vehicle, vehicle to worksite. I rented an electric cement mixer to do the mixing. For a project of this magnitude, it is the ideal size. Since this was a one-person effort, there was no way I could keep up with the curing concrete while mixing and pouring new batches; other people would just use a wheel barrel, but not me. Both time and lives were saved by the electric cement mixer. I maintained it running directly at the edge of the 2×6 form I constructed and poured into it.
Speaking of the form, use screws when assembling so you may take them out and disassemble it after the job is complete. To maintain everything in its proper place, I established my form, inserted screws to the stakes into the form, and utilized scrap wood for the stakes. I leveled and left-to-right-checked my form. I then wanted a small dip from the back of the slab to the front to accommodate any water drainage.
We’re Not Done Yet
I ultimately decided to hire a Concrete Vibrator as well, even though it wasn’t necessary for a project of my size. This is one of those tools that, until I actually needed it, I didn’t understand how much I needed. On larger projects, this is generally employed to pour concrete into tight areas and into every crevice. The concrete vibrator dips in and then shakes that added moisture to the surface because my mixture was wildly uneven. I would have had serious curing problems if I hadn’t utilized the Concrete Vibrator.
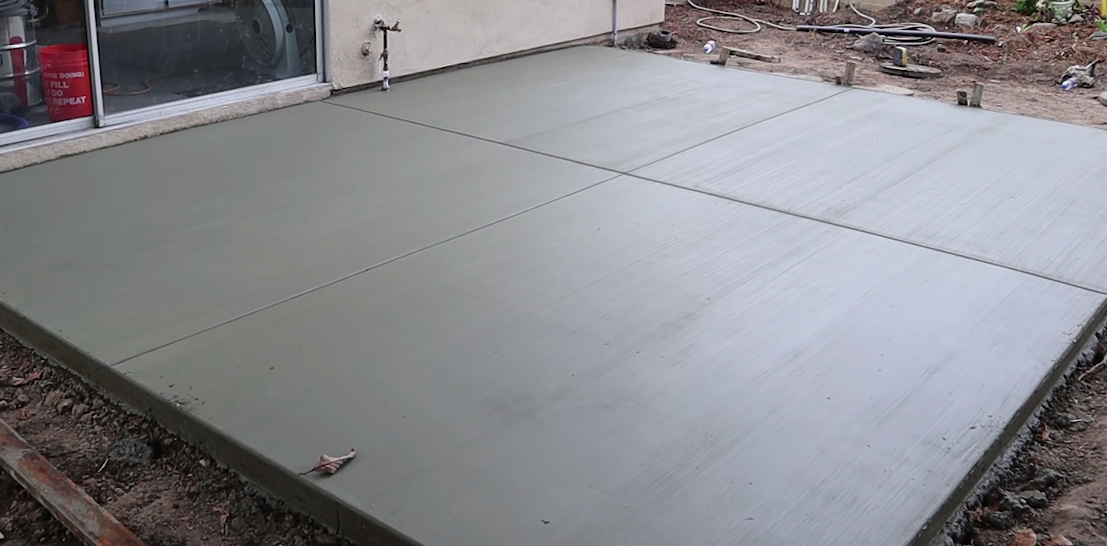
I was able to remove a large amount of the extra moisture using a bull float and a trowel before smoothing out the surface. Although I was a little concerned about how wet my mixture had become on the top, it ended up curing wonderfully.
One more trick: I used a push broom to lightly brush the surface after the surface had been curing for about two hours. This gives the surface a light roughness that improves traction. I could have let it to dry naturally if I needed a smooth finish, but the brush coat works well for my shop extension and covers up a lot of my mistakes.
Final Form
I gave my slab 48 hours to cure before popping my form, just to be safe. This is where the earlier screws come into play. I immediately peeled the forms off after backing them out of the pegs and corners. No wax or releasing agent is required.
I went back and placed the fill dirt I had saved back around the edges to complete the project. Phase two of this project is now underway, and it will involve building the lean-to shed. So be sure to check back for developments!